屏幕适配 Autolayout
- 什么是适配?
- 适应、兼容各种不同的情况
- 移动开发中,适配的常见种类
- 系统适配
- 针对不同版本的操作系统进行适配
- 屏幕适配
- 针对不同大小的屏幕尺寸进行适配
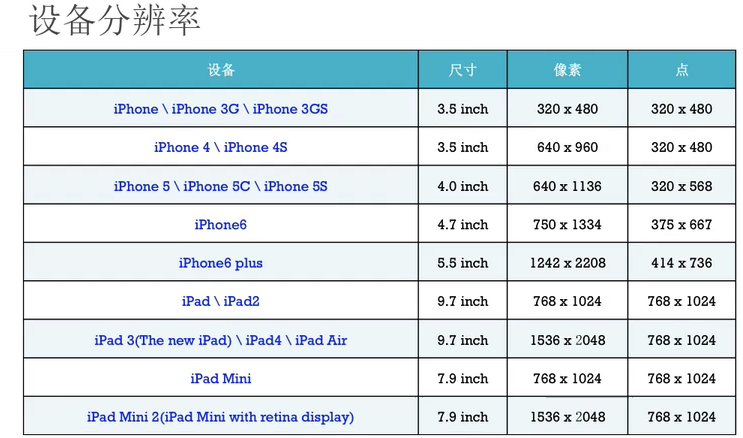
iPhone的尺寸
- 3.5inch、4.0inch、4.7inch、5.5inch
iPad的尺寸
- 7.9inch、9.7inch、12.9inch
屏幕方向
- 竖屏
- 横屏
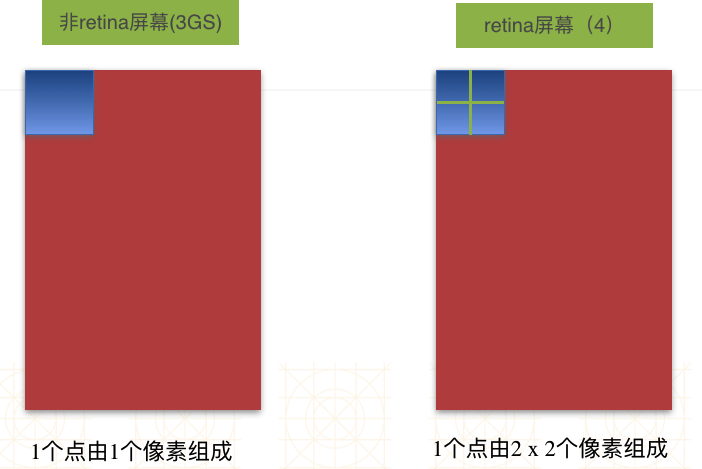
点和像素
- 在用户眼中
- 屏幕是由无数个像素组成的
- 像素越多,屏幕越清晰
- 在开发者眼中
- 屏幕是由无数个点组成的,点又是由像素组成的
- 像素越多,屏幕越清晰
简介(屏幕适配发展史)
- 在以前的iOS程序中,是如何布局UI界面的?
- 写固定值-> autoresizingMask -> autolayout-> sizeClasses
- iPhone1-iPhone4s时代 屏幕的尺寸固定为(320,480) ,我们只需要简单计算一下相对位置就好了
- iphone5-iphone5s时代屏幕的尺寸变了(320,568) 这时AutoresizingMask派上了用场(为什么不用Autolayout? 因为还要支持ios5)
- iphone6时代 屏幕的宽度也发生了变化,终于是时候抛弃AutoresizingMask改用Autolayout了(1.不用支持ios5了 2. 相对于屏幕适配的多样性来说autoresizingMask也已经过时了)
- 直到iphone6发布之后 我知道使用Autolayout势在必行了
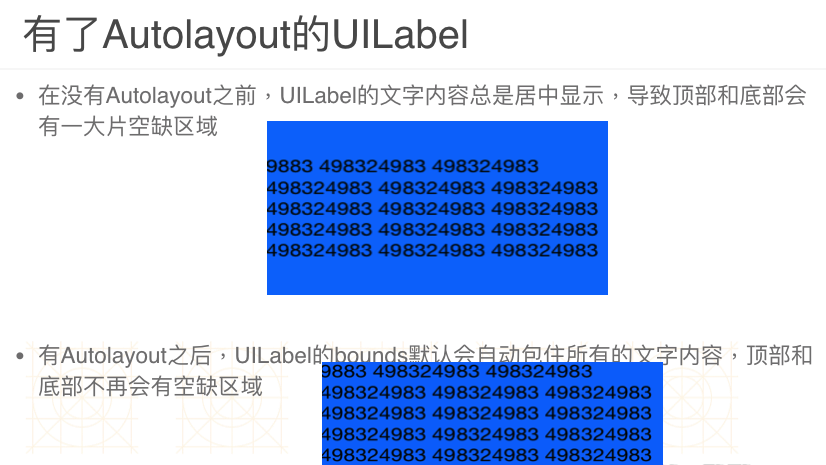
什么是Autolayout
- Autolayout是一种“自动布局”技术,专门用来布局UI界面的
- Autolayout自iOS 6开始引入,由于Xcode 4的不给力,当时并没有得到很大推广
- 自iOS 7(Xcode 5)开始,Autolayout的开发效率得到很大的提升
- 苹果官方也推荐开发者尽量使用Autolayout来布局UI界面
- Autolayout能很轻松地解决屏幕适配的问题
Autoresizing和Autolayout
Autoresizing
- Autoresizing和Autolayout是敵對關系,有Autoresizing就没有Autolayout,也就是說如果你想使用autoreszing就不能使用autolayout
- 注意:sizeClasses是衣懶autolayout,如果你需要使用sizeClasses就要継承autolayout
- 在Autolayout之前,有Autoresizing可以作屏幕适配,但局限性较大,有些任务根本无法完成(Autoresizing只能设置自身和父控件之间的关系)
- Autoresizing仅仅能解决子控件和父控件之间的相对关系问题
- 相比之下,Autolayout的功能比Autoresizing强大很多
- Autolayout解决任何控件之间的相对关系问题
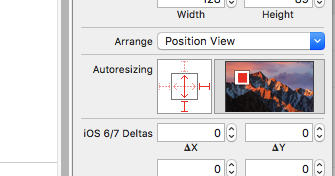
- autoresizing在xcode的實現
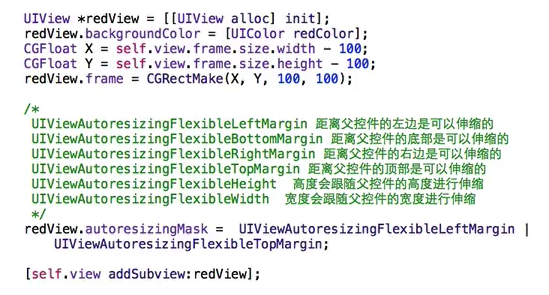
- autoresizing的代碼如何實現
Autolayout的2个核心概念
- 约束:通过给控件添加约束,来决定控件的位置和尺寸
- 参照:在添加约束时,是依照谁来添加(可以是父控件或者兄弟控件)
Autolayout的警告和错误
警告
- 控件的frame不匹配所添加的约束, 比如
- 比如约束控件的宽度为100, 而控件现在的宽度是110
错误
- 缺乏必要的约束, 比如
- 只约束了宽度和高度, 没有约束具体的位置
两个约束冲突, 比如
- 1个约束控件的宽度为100, 1个约束控件的宽度为110
代码实现Autolayout
代码实现Autolayout的步骤
利用NSLayoutConstraint类创建具体的约束对象
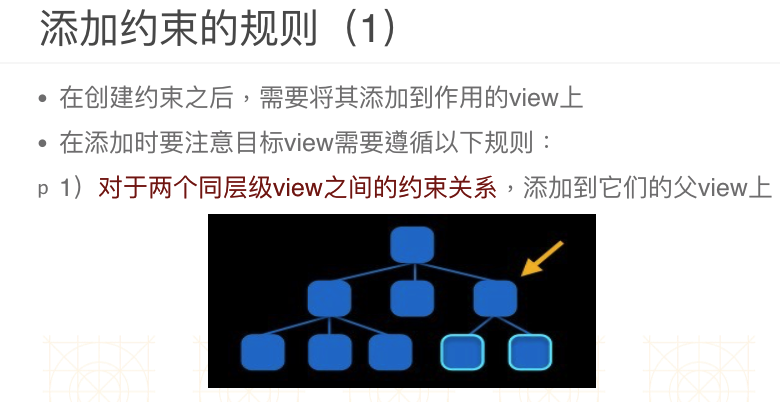
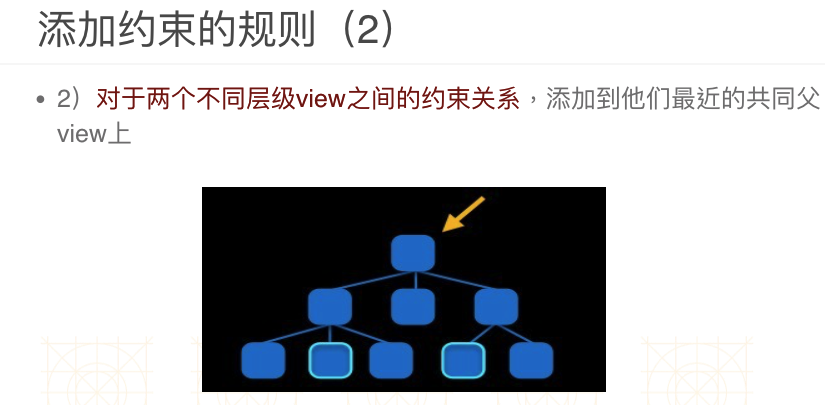
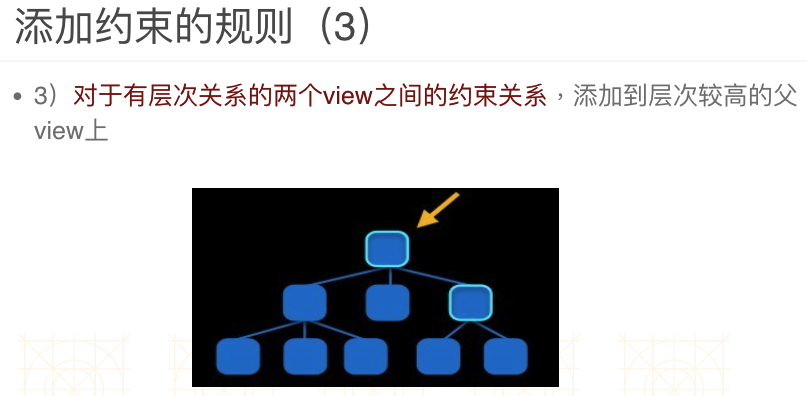
添加约束对象到相应的view上
- (void)addConstraint:(NSLayoutConstraint *)constraint;
- (void)addConstraints:(NSArray *)constraints;
代码实现Autolayout的注意点
要先禁止autoresizing功能,设置view的下面属性为NO
view.translatesAutoresizingMaskIntoConstraints = NO;
添加约束之前,一定要保证相关控件都已经在各自的父控件上
不用再给view设置frame
NSLayoutConstraint
一个NSLayoutConstraint对象就代表一个约束

创建约束对象的常用方法
+(id)constraintWithItem:(id)view1 attribute:(NSLayoutAttribute)attr1 relatedBy:(NSLayoutRelation)relation toItem:(id)view2 attribute:(NSLayoutAttribute)attr2 multiplier:(CGFloat)multiplier constant:(CGFloat)c;
view1 :要约束的控件
attr1 :约束的类型(做怎样的约束)
relation :与参照控件之间的关系
view2 :参照的控件
attr2 :约束的类型(做怎样的约束)
multiplier :乘数
c :常量
自动布局的核心计算公式
自动布局的核心计算公式
obj1.property1 =(obj2.property2 * multiplier)+ constant value
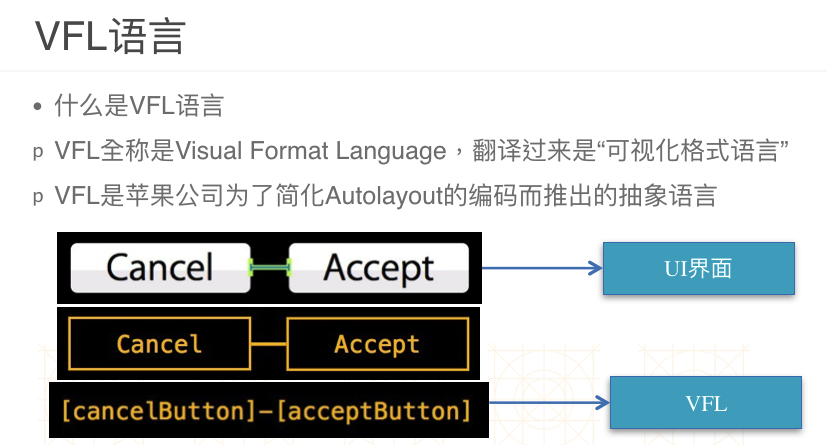
VFL示例
H:[cancelButton(72)]-12-[acceptButton(50)]
canelButton宽72,acceptButton宽50,它们之间间距12

H:[wideView(>=60@700)]
wideView宽度大于等于60point,该约束条件优先级为700(优先级最大值为1000,优先级越高的约束越先被满足)

V:[redBox][yellowBox(==redBox)]
竖直方向上,先有一个redBox,其下方紧接一个高度等于redBox高度的yellowBox

H:|-10-[Find]-[FindNext]-[FindField(>=20)]-|
水平方向上,Find距离父view左边缘默认间隔宽度,之后是FindNext距离Find间隔默认宽度;再之后是宽度不小于20的FindField,它和FindNext以及父view右边缘的间距都是默认宽度。(竖线“|” 表示superview的边缘)
VFL的使用
使用VFL来创建约束数组
+ (NSArray *)constraintsWithVisualFormat:(NSString *)format options:(NSLayoutFormatOptions)opts metrics:(NSDictionary *)metrics views:(NSDictionary *)views;
format :VFL语句
opts :约束类型
metrics :VFL语句中用到的具体数值
views :VFL语句中用到的控件

创建一个字典(内部包含VFL语句中用到的控件)的快捷宏定义
NSDictionaryOfVariableBindings(...)
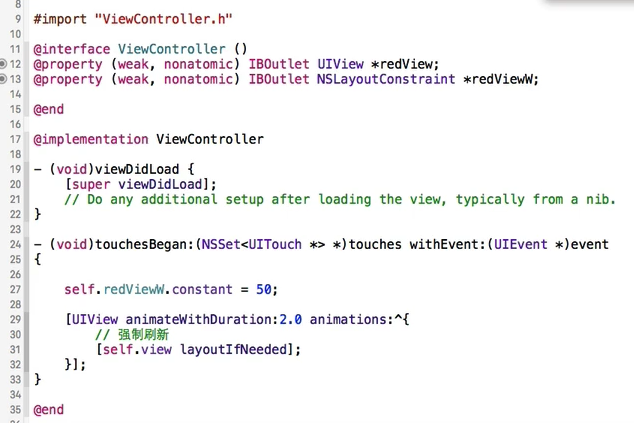
 基于Autolayout的动画
在修改了约束之后,只要执行下面代码,就能做动画效果
[UIView animateWithDuration:1.0 animations:^{
    [添加了约束的view的父控件 layoutIfNeeded];
}];
Masonry
- 因為autolayout代碼實現太蔴煩,所以在開發中,會用第三方法框架取代苹果的代碼實現autolayout的方法,大大的提高了開發效率
目前最流行的Autolayout第三方框架
用优雅的代码方式编写Autolayout
省去了苹果官方恶心的Autolayout代码
大大提高了开发效率

框架地址:
https://github.com/SnapKit/Masonry
這是用Masonry枉架做的一個練習:
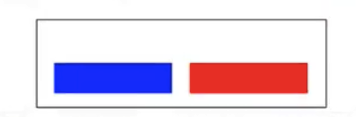
案例代碼:
#import "ViewController.h"
//define this constant if you want to use Masonry without the 'mas_' prefix
#define MAS_SHORTHAND

//define this constant if you want to enable auto-boxing for default syntax
#define MAS_SHORTHAND_GLOBALS
#import "Masonry.h"

@interface ViewController ()

@end

@implementation ViewController

- (void)viewDidLoad {
    [super viewDidLoad];
    //用Masonry做自動屏幕适配
    //redView
    UIView *redView = [[UIView alloc] init];
    redView.backgroundColor = [UIColor redColor];
    [self.view addSubview:redView];
    //blueView
    UIView *blueView = [[UIView alloc] init];
    blueView.backgroundColor = [UIColor blueColor];
    [self.view addSubview:blueView];

    //blueView設置約束
    [blueView mas_makeConstraints:^(MASConstraintMaker *make) {
        make.left.equalTo(self.view.left).offset(30);
        make.bottom.equalTo(self.view.bottom).offset(-30);
        make.right.equalTo(redView.left).offset(-30);
        make.width.equalTo(redView.width);
        make.height.equalTo(50);

    }];
    //redView設置約束
    [redView makeConstraints:^(MASConstraintMaker *make) {
        make.right.equalTo(self.view.right).offset(-30);
        make.top.equalTo(blueView.top);
        make.bottom.equalTo(blueView.bottom);

    }];
    //更新約束
    [blueView updateConstraints:^(MASConstraintMaker *make) {
        make.height.equalTo(80);
    }];

}


@end
mas_equalTo和equalTo
默认情况下
mas_equalTo有自动包装功能,比如自动将20包装为@20
equalTo没有自动包装功能

如果添加了下面的宏,那么mas_equalTo和equalTo就没有区别
#define MAS_SHORTHAND_GLOBALS
// 注意:这个宏一定要添加到#import "Masonry.h"前面
mas_width和width
默认情况下
width是make对象的一个属性,用来添加宽度约束用的,表示对宽度进行约束
mas_width是一个属性值,用来当做equalTo的参数,表示某个控件的宽度属性

如果添加了下面的宏,mas_width也可以写成width
#define MAS_SHORTHAND

mas_height、mas_centerX以此类推
可有可无的用法
以下方法都仅仅是为了提高可读性,可有可无
- (MASConstraint *)with {
    return self;
}

- (MASConstraint *)and {
    return self;
}